Modifying the Blade CP Pro - brushless tail motor
|
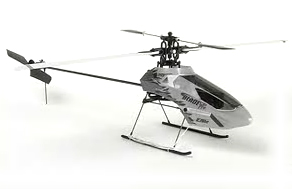 |
Tail Control - the holy grail of Blade CP Pro pilots (also for Honey Bee CP2)
The Blade CP Pro flies like a dream with a brushless tail motor. Many, many RC helicopter pilots have flown this model. A lot of us have installed stronger brushed 'direct drive' motors and dual tail motors to overcome the primary flaw in its design: inadequate tail control. The brushless tail motor is the ultimate in tail authority for this helicopter. Well, some folks will say the ultimate modification is a belt-drive tail such as the Freestyle belt drive tail kit. We're trying to make the helicopter work good while keeping it relatively simple and low in cost.
This modification is much easier if you have a computer radio. Most RC helicopter pilots switch from using stock transmitters to full-function computer radios sometime in their first year of flying. A good radio like a Futaba, Spektrum, or JR, will last for years and can be used to control ten or twenty models. The programming options let you set your helicopters and airplanes up to suit your flying ability.
Components needed
Small brushless motor, electronic speed controller (ESC), separate gyro (may as well be a heading hold gyro) one extra length of wire to the tail, heat shrink tubing, 3" or 4" propellor.
My blade uses a 10 gram 2000 kv outrunner BM from Hobby-city.com and a Turnigy Plush 10 amp ESC from the same source. These components are very light, inexpensive, and work well. The ESC is easy to program and comes with complete and accurate directions for doing so. I bought both of them from www.Hobby-city.com
Motor: 18-11 2000kv Micro Brushless Outrunner (10g)
ESC: TURNIGY Plush 10 amp 9 gram electronic speed controller
Mechanics
I modified the Blade's plastic tail motor case to accept the motor. This meant enlarging the center hole and making two small holes in the sides to pass screws to the motor's base. I also made a channel on the rotor side to accommodate the wires from the motor.
Enlarge the center hole and cut a channel with a dremel for wires from the motor. |
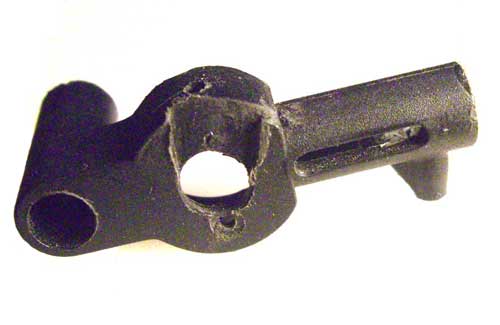 |
Side view: make two holes to pass screws to the motor's center hub. |
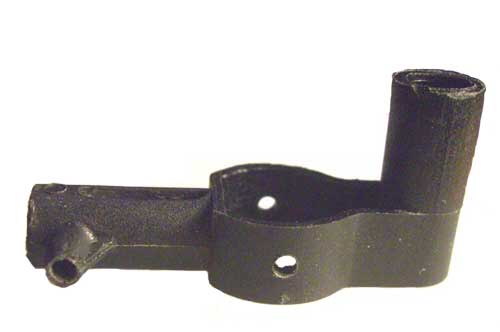 |
Motor installed in the modified tail case. Note the wires in their channel. |
 |
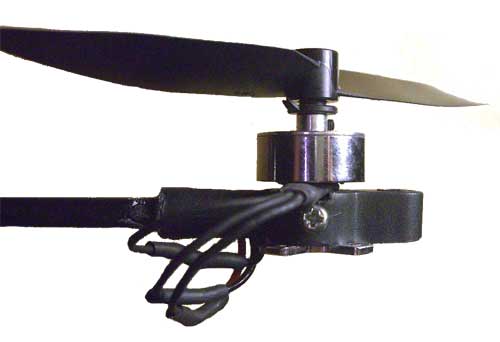
Here is the tail case installed on the tail boom with the propellor. |
 |
Electronics
Using a brushless motor means using a separate gyro and a separate speed controller. If the Blade in question has been fitted with a brushless main motor as well we get to ditch the 3-in-1, a welcome weight savings to offset the additional weight of the gyro and second ESC. After removing the mixing board you can turn the receiver on its side. This will usually eliminate any glitching that has been occuring. The 10 gram brushless tail motor is controlled by a Turnigy Plush 10 amp ESC. Both the tail motor and main motors' ESC's are mounted below the main gear using the CF rods and an extra battery tray.
Wires from the smaller ESC run inside the tail boom. Believe it or not it is easier to push three wires through it than two because there is no room for them to kink. In my installation I decided to solder the connections to and from the tail motor's ESC. I soldered all three with heat shrink tubing to the wires at the frame. At the tail I completed the heat shrink process on one wire and left the tubing alone on the other two until I verified that the 4040 propellor was pushing in the correct direction. The lead from the ESC to the gyro has three wires. The center red wire should be removed (see gyro picture below) from the plug by pushing an X-acto blade under its keeper while pulling gently on the wire. On the power side I soldered the red and black leads direction to the wires to the JST plug that mates with my batteries. Power leads from both ESC's meet on these leads.
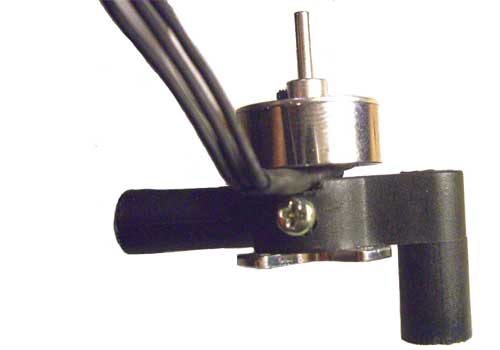
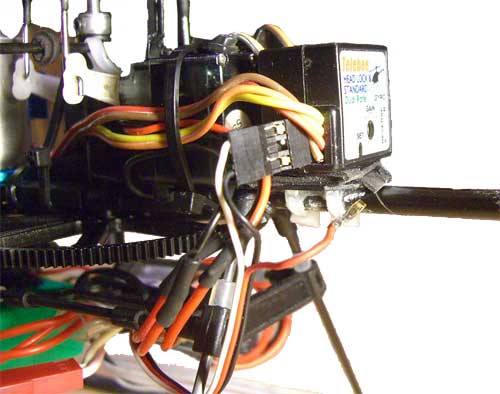
| The signal from channel four of the E-flite receiver goes to the external gyro, in this case a Telebee 11 gram with heading hold. From the gyro the signal goes to the tail motor's ESC. |
|
The smaller ESC on the right controls the brushless tail motor. |
 |
Programming
The ESC for the tail motor should not be programmed to see li-po batteries, but nickle-metal hydride, i.e.: ni-mh. That way it expects far less voltage and will not cut off for low voltage when the main motor is still turning. (Sure would hate the tail to stop working in the air!)
On my heli the tail motor kept spinning after the left stick was lowered all the way. I had to keep the left stick all the way to the left to stop the tail rotor until I could get a hand on the tail boom. Then, letting go of the transmitter (TX), the motor went back to spinning until I unplugged flight power. So I had to program the Tx using programmable mixing. This cannot be done with the stock E-flite transmitter. If you use the stock Tx you will have to push the left stick all the way left to get the tail to stop turning after you land.
In programmable mixing one channel is slaved to another channel. I defined channel 3 (throttle) as the master and channel 4 (rudder) as the slave. I then defined the slave as minus 50% (just to be sure) when the throttle was at 0% in normal mode. In other words the tail motor is off when the left stick is down. In theory setting channel 4 to 0% would be enough but I don't want there to be any chance of the tail spinning up when the main motor stops.
Next came setting sub-trim on the rudder channel to get the tail to stay in one place. Mine is set to -52%. It may need this much sub-trim because I have a 4" propellor on the tail. I understand most guys use 3" or 3.5" props. In any case, the tail is so solid that I can set the throttle to hover and fly the helicopter with my right hand only. Also, the bigger propellor doesn't turn as fast to produce thrust as a 3" prop so my Blade's tail doesn't sound like an angry mosquito.
Last comes gyro gain. At this writing it is set to 65% and the tail still wags a trifle. I am having a lot of fun gradually dialing it in!
Flight test
After hovering inside to set the programming as described I took the helicopter to the park on a dead-calm morning. It flew quiet, stable, and more controllable than ever. Before performing this modification I had been flying with the rate gyro on the mixing board and a dual tail motor set up. Some crashes occurred during stall turns because instead of swinging the tail around 180 degrees sometimes the heli went into a piroette and came down more strangely than I was ready to deal with. During initial test flights with the brushless tail motor the tail swung smartly around and stopped in the correct orientation. A series of increasingly aggressive flights has demonstrated that the motor and speed controller used in this model can, in conjunction with a good heading hold gyro, solve the Blade CP Pro's tail control problem.
Blade CP Pro flying indoors |